Writing A Ray Tracer in Go - Part 2
Updated: Thursday, December 16, 2021
This is part 2 of my journey to try and write a ray/path tracer in Go. Checkout part 1 here.
I’m roughly following the e-book Ray Tracing in One Weekend, but translating all of the code into Go.
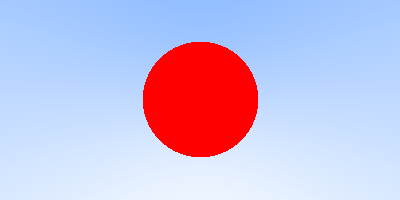
In the previous post we covered how a path tracer works and got an image to display on the screen by blending red, green and blue into a cool looking gradient. This time around we’ll draw a sphere instead, but by actually sending rays into the scene and marking the pixels where they hit the object.
This is the first major step into building a fully functional path tracer. Lets get to it.
All of the code for this post can be found on my Github.
Level Up With Go
Thanks for reading! While you're here, sign up to receive a free sample chapter of my upcoming guide: Level Up With Go.
No spam. I promise.
Rays
Every ray/path tracer has one thing in common, a way to model a ray. A ray is defined as:
In geometry, a ray is a line with a single endpoint (or point of origin) that extends infinitely in one direction.
So, a ray has two parts: origin and direction.
We can model this in our code by defining a struct like so:
type Ray struct {
    Origin, Direction Vector
}
Next, we need to be able to move along our ray either forward or backward. The function to allow us to do so is defined as: p(t) = A + t * B where A is the ray origin, B is the ray direction, and t is a real number.
In code, this looks like:
func (r Ray) Point(t float64) Vector {
    b := r.Direction.MultiplyScalar(t)
    a := r.Origin
    return a.Add(b)
}
This method takes in a t as a float64 and returns a position vector in 3D space, which is our new position on our ray.
Adding a Sphere
Now that we can define and move along a ray, we need to add the second piece of the puzzle, a sphere.
In geometry a sphere is defined as having a center and radius.
We can model this in Go with another simple struct:
type Sphere struct {
    Center Vector
    Radius float64
}
Now comes the fun part, adding the ability for a ray to determine whether or not it comes in contact with a sphere.
Intersecting with the Sphere
note: Math ahead. I had trouble remembering a lot of this from algebra/geometry class, so if like me you need a refresher, this link may come in handy.*
The book goes into greater detail, however the basic formula for determining if a point is on a sphere is as follows:
dot((p - C),(p - C)) = R * R
Where p is the point, C is the center of our sphere, and R is the sphere radius.
Now this is great, but we want to know if our ray p(t) = A + t * B ever hits the sphere anywhere. So basically, is there any t for which p(t) satisfies the sphere equation.
This corresponds to:
dot((p(t) - C),(p(t) - C)) = R * R
Which expands to:
dot((A + t * B - C),(A + t * B - C)) = R * R
Expanding and moving all terms to the LHS, we get:
t * t * dot(B, B) + 2 * t * dot(A-C, A-C) + dot(C, C)
Since this is quadratic, we can use the quadratic formula to solve for t. When solving the quadratic, there is the discriminant portion of the equation (b * b - 4ac) which tells us the number of solutions.
If the discriminant is:
- positive - there are 2 real solutions
- negative - there are 0 real solutions
- zero - there is 1 real solution
All this boils down to the following method:
func (r Ray) HitSphere(s Sphere) bool {
    oc := r.Origin.Subtract(s.Center)
    a := r.Direction.Dot(r.Direction)
    b := 2.0 * oc.Dot(r.Direction)
    c := oc.Dot(oc) - s.Radius*s.Radius
    discriminant := b*b - 4*a*c

    return discriminant > 0
}
Adding Color
Now that we can determine if our rays hit our sphere, lets add some color. We want our image to show that when a ray does hit the sphere the pixel is marked red, and when they don’t, it shows up as a nice blue gradient.
Again the book goes into greater detail on how this is done, but I tried to comment the Color method as best I could:
func (r Ray) Color() Vector {
    sphere := Sphere{Center: Vector{0, 0, -1}, Radius: 0.5}

    if r.HitSphere(sphere) {
        return Vector{1.0, 0.0, 0.0} // red
    }

    // make unit vector so y is between -1.0 and 1.0
    unitDirection := r.Direction.Normalize()

    // scale t to be between 0.0 and 1.0
    t := 0.5 * (unitDirection.Y + 1.0)

    // linear blend
    // blended_value = (1 - t) * white + t * blue
    white := Vector{1.0, 1.0, 1.0}
    blue := Vector{0.5, 0.7, 1.0}

    return white.MultiplyScalar(1.0 - t).Add(blue.MultiplyScalar(t))
}
Putting it All Together
After updating our code to use these new methods, running the program via go run *.go yields the out.ppm file which gives us:

Note the jagged edges of the sphere, this is because we haven’t implemented anti-aliasing yet, so the pixel is either red or part of the background (there is no blending happening). We’re going to fix this in a later edition.
Well, that’s enough for now. Next time we’ll work on shading and add another object to the scene.
Update: Part 3 is available here: https://markphelps.me/posts/writing-a-ray-tracer-in-go-part-3/