Writing a Ray Tracer in Go - Part 4
Updated: Sunday, November 21, 2021
This is part 4 of my series on writing a ray/path tracer in Go. Check out parts 1, 2 and 3.
I’m roughly following the e-book Ray Tracing in One Weekend, but translating all of the code into Go.
All of the code for this post can be found on my Github.
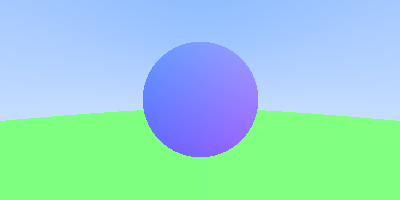
Last time we added the ability to shade our sphere and added anti-aliasing to make everything look better.
This resulted in the following image:
This time we are going to take a major leap forward and introduce different materials to our path tracer. This will allow us to make more interesting images and will more closely simulate real world objects.
The two material types we are going to introduce are matte materials and metal materials. Let’s get to work.
Matte Is Where It’s At
Before we begin adding a matte material type, it’s worth going over what actually gives different materials their ‘look’. Meaning why do some materials look matte while others look mirrored or even translucent? It all comes down to how light is reflected and/or absorbed from these different material types.
Matte, or diffuse surfaces may absorb some light, but also reflect light rays in random directions. Any surface that reflects light in this manner will look matte.
In order to model this in code, I first want to introduce the concept of a Material. This will allow us to cleanly model any type of material we want.
This interface will have two methods Bounce and Color. Bounce is responsible for implementing how each material type will reflect or ‘bounce’ light off of it, while Color is responsible for returning that material’s intrinsic color as a Vector.
package primitives

type Material interface {
    Bounce(input Ray, hit Hit) (bool, Ray)
    Color() Vector
}
As you can see, Bounce takes in a input Ray and a Hit record and returns two types, a boolean that represents if that material reflected light and a Ray that represents that resulting reflection (if it occurred).
Level Up With Go
Thanks for reading! While you're here, sign up to receive a free sample chapter of my upcoming guide: Level Up With Go.
No spam. I promise.
For our matte materials, we are going to use a method of calculating reflection called Lambertian reflectance. For our purposes, this method is implemented by taking a random point on the unit sphere that is tangent to our object’s hit point and then sending a ray from that hit point to this random point.
This can be better show in code:
var UnitVector = Vector{1, 1, 1}

// rejection method for finding random point on unit sphere
func VectorInUnitSphere() Vector {
    for {
        r := Vector{rand.Float64(), rand.Float64(), rand.Float64()}
        p := r.MultiplyScalar(2.0).Subtract(UnitVector)
        if p.SquaredLength() >= 1.0 {
            return p
        }
    }
}
package primitives

type Lambertian struct {
    C Vector
}

func (l Lambertian) Bounce(input Ray, hit Hit) (bool, Ray) {
    direction := hit.Normal.Add(VectorInUnitSphere())
    return true, Ray{hit.Point, direction}
}

func (l Lambertian) Color() Vector {
    return l.C
}
These changes require that we also update our color method in our main file to work with the Material interface like so:
func color(r p.Ray, world p.Hitable, depth int) p.Vector {
    hit, record := world.Hit(r, 0.001, math.MaxFloat64)

    if hit {
        if depth < 50 {
            bounced, bouncedRay := record.Bounce(r, record)
            if bounced {
                newColor := color(bouncedRay, world, depth+1)
                return record.Material.Color().Multiply(newColor)
            }
        }
        return p.Vector{}
    }

    return gradient(r)
}
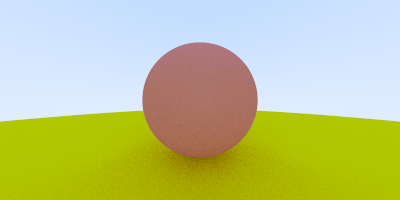
Putting all of this together results in the following image:
So Metal
Reflective surfaces such as many metals have a much different way of reflecting light than matte surfaces. Instead of reflecting light in random directions such as with diffuse reflectance, metals reflect light in a way that is described as specular reflection.
The algorithm for determining the direction of the reflected ray can be described in pseudo code as incident_vector - (2 * dot(incident_vector, surface_normal) * surface_normal).
Putting this in code yields the following implementation for our Metal type:
package primitives

type Metal struct {
    C Vector
}

func (m Metal) Bounce(input Ray, hit Hit) (bool, Ray) {
    direction := reflect(input.Direction, hit.Normal)
    bouncedRay := Ray{hit.Point, direction}
    bounced := direction.Dot(hit.Normal) > 0
    return bounced, bouncedRay
}

func (m Metal) Color() Vector {
    return m.C
}

func reflect(v Vector, n Vector) Vector {
    b := 2 * v.Dot(n)
    return v.Subtract(n.MultiplyScalar(b))
}
Adding two metal spheres adjacent to our initial sphere, each with two different intrinsic colors results in the following image:
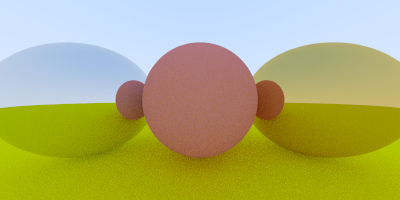
Note that both of these spheres are perfectly reflective such as a mirror would be. In order to add more realistic looking metals we can introduce a fuzz coefficient to randomize the reflected direction a little. We can use a similar method to the one we used with diffuse materials by adding the following code to our Metal type:
package primitives

type Metal struct {
    C    Vector
    Fuzz float64
}

func (m Metal) Bounce(input Ray, hit Hit) (bool, Ray) {
    direction := reflect(input.Direction, hit.Normal)
    fuzzed := VectorInUnitSphere().MultiplyScalar(m.Fuzz))
    bouncedRay := Ray{hit.Point, direction.Add(fuzzed)}
    bounced := direction.Dot(hit.Normal) > 0
    return bounced, bouncedRay
}
Playing around with different fuzz coefficients between 0.0 and 1.0 for the right-most sphere can give us an image similar to this:
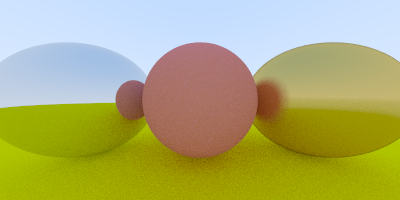
Pretty slick.
Progress
One small feature that I wanted to add that’s not covered in the book is the ability to show progress as the image is being rendered as well as the time spent rendering. I came across the time package from the Go standard library which has everything required to implement a simple progress indicator.
It also provides a nice API to get the duration of time passed by using the Since function like so:
start := time.Now()

// .. some long running operation

fmt.Printf("\nDone.\nElapsed: %v\n", time.Since(start))
After the operation completes, this will output:
Done.

Elapsed: 8.264296922s
Finally, to add the progress indicator while the rendering is taking place we need to get a little more clever. Luckily, the Go time package again provides a simple solution with the Ticker type. The Ticker type contains a channel that is sent a tick after a specified interval expires. We can then consume from this channel and output . each time the tick occurs.
// inside the render function in main.go

// create the ticker to tick every 100 milliseconds
ticker := time.NewTicker(time.Millisecond * 100)

// ...

// create an anonymous goroutine to consume from the channel
// and print after each tick
go func() {
  for {
    <-ticker.C
    fmt.Print(".")
  }
}()

// ...

// when rendering is done, stop the ticker so the goroutine does not block
ticker.Stop()
Putting all this together results in more informative output:
$ go run *.go
..................................................................................

Done.

Elapsed: 8.264296922s
That’s it for this post, we’re one huge step closer to completing our path tracer. Hopefully you found this interesting.
Update: Part 5 is available here: https://markphelps.me/posts/writing-a-ray-tracer-in-go-part-5/